
(Update: If you want to know how to do this quickly, stop reading and check out the Assembly Video at Organic Compost Tumbler. You'll find it in the menu at the bottom of the page.)
Vegetable oil at the ready, I’m poised to assemble my new composter, the one all the folderol was about a couple of weeks back. It's mine courtesy of Chris of Organic Compost Tumbler in exchange for a review, which won't happen until I've had a chance to put it through its paces.
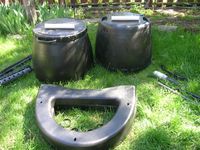
This Urban Tumbler started its tumbling career early, before it even got out of the box. Boxes, to be precise, as there were two. The wheelbarrow being otherwise engaged, I had to get them into the backyard without the benefit of wheels. I could just get my arms around the smaller one, so off we went together, traveling sideways so I could see approximately where we were going. The bigger one, which contains the tumbler itself, its two halves nested, isn’t outrageously heavy, but it’s so bulky I had to roll it. Of course, I could have put the pieces together and rolled the tumbler itself, but my eagerness didn’t allow for such rational steps. The back yard is the designated assembly center, and all assembly shall occur there, dang it.
All the pieces and parts are here and accounted for, the badly written and poorly edited directions have been read, their grammar errors bemoaned and their contents absorbed. (One of two halves is not one halve, but by dint of repetition, even poorly made points become clear, eventually.) (Chris is not to be held liable for the horrors of this literature, which are solely the responsibility of the parent company, may their editors rot in literary hell.)
The vegetable oil, the only required item that doesn’t come in the box, stands by in the autumn asters; the scales rest on the only approximately level place in the lawn. It’s now 4:15 and the stop-watch is running. Let’s see how fast this can be done, and whether it can be done at all by a small but determined woman on her own. (The brochure implies that it can; it’s many pictures feature carefully manicured female hands.)
4:15 Outside to begin assemblage.
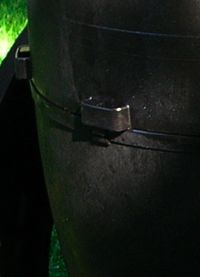
4:50 Whew. The hardest part—I hope—is done: the two halves of the tumbler proper are now fitted together. There’s a tongue-in-groove construction—the bottom of the top has a narrow groove which fits over the top of the bottom, if you get my meaning. Once in place, the two pieces need to be rotated until the holes for the pivot rod (the axle around which the tumbler rotates) align. The instructions say to oil the bottom tongue liberally, so when I ran into trouble the first time I took the top off and added more oil. They wanted liberal, they were going to get liberal. Even so, when I tried a second time the top slid just a touch, then stuck.
5:05 Okay, just time for a second drink, and I’m going back out for round two: putting together the stand and getting the barrel onto it.
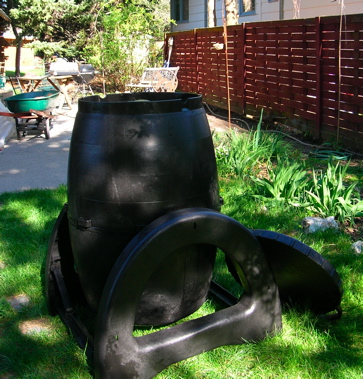
5:30 Done. The whole thing took an hour, not counting the break. Not bad, for something that only needs to be done once, and I don’t think I broke anything with the sledgehammer. The instructions said nothing about such tools, but it’s not clear how else I would have managed.
The horizontal bars joining the big curved sections presented a particular challenge. I put one of the D-shaped pieces flat on the ground, set a bar in place and leaned on it, but nothing happened. Even with my full weight on it and my feet dangling in the breeze (it was a windy day) I couldn’t sink it. Tried again from a footstool, with the same non-results. The sledge, however, commands respect. I used it like a hammer, choked up for maximum control, and it worked.
Assembling the stand would have taken less time if I hadn't made the mistake of attaching the gussets to the D first, instead of to the horizontal bar. Fortunately, using a screwdriver carefully, it's possible to wedge open one section of the column into which the gusset fits and pull it free. Whew agan.
When it was time to set the second D on top, there were five points to align: the two posts, the gusset brackets that brace the posts and Ds, and the pivot rod. So I got them all lined up before tapping each with the sledge in turn, checking, and tapping again. It wouldn’t have looked good if I’d destroyed the thing before even trying it out.
So here it is in all its glory. How this could be seen as an aesthetic improvement to any yard baffles me, but so the brochure claims.
Updated: I've just discovered that Chris posted a video on his blog, showing how to put together this composter. His technique differs from that in the instructions in a couple of important ways: using spray oil, he lubricates both sides of the tongue-and-groove construction, instead of just the bottom one. Secondly, instead of a screwdriver, he uses a hammer to get the two halves together. The manufacturers would do well to take note. He does the whole thing in under ten minutes, without hurrying, blast him.
_____________________________________________________
*About the handles: at first thought, the one on the upper half would prevent its nesting inside the lower half while in transit. However, the lower half could be made with a deep groove on the inside—a groove which would accomodate the handle on the upper half. For transportation or storage, you’d turn the top half upside down, line up its handle with the groove in the bottom half, and drop the upper piece into place. Ta da. Of course, all this would raise construction costs….
 Subscribe to RSS feed


God, woman, you are so obsessed with compost. I have been doing some sums here on the back on an envelope and I estimate that by now if all your blog posts about compost making are true you should have produced [frowns for a minute] 254,785 cubic metres of fresh humus. Jeez! It’s probably a good thing you can’t assemble the tumbler!
Mercy, Kathryn! Between the vegetable oil and the sledgehammer, regular Happy Hour breaks do indeed seem necessary. I hate things that don’t come preassembled! And I agree, it’s anything but aesthetic (a delightful quality it shares with all plastics). But at least the fence behind it is gorgeous! I’ll be waiting to hear how it works out.
That is some scary compost bin, but it is not for us to like it, it’s for the worms.